Sephora.com, Inc.

Sunday, November 13, 2011

Review + Comparison - NARS Eye Contour Brush vs Coastal Scents Sable Contour Brush vs Ulta Tapered Crease Eyeshadow Brush vs Japonesque Pro Crease Brush vs Studio Gear Crease Contour Brush

From Left to Right: Coastal Scents C138 Sable Contour brush, NARS #14 Eye Contour brush, Japonesque Professional Eye Shadow Crease brush, Ulta Pro Tapered Crease Eyeshadow brush, Studio Gear #35 Blending Crease Contour brush

*Description*

Coastal Scents Sable Contour Brush $1.79 - This brush is made from soft natural bristles. It's thicker and denser, but not as firm as the NARS brush. The Coastal Scents brush is also similar to the Japonesque brush in terms of application; however, the head of the Coastal Scents brush is a little shorter, more pointed & less denser.

NARS Eye Contour Brush $28 - This brush is made from 80% pen super goat hair and 20% pony hair. The bristles feel soft when I run my fingers through them; however, when I use the brush on my eye area, it feels a bit prickly. This brush has a very tapered point and is firm. I wouldn't consider the Coastal Scents brush to be a dupe for this because the Coastal Scents brush isn't as firm and it isn't as pointy or thin as the NARS brush.

Japonesque Professional Crease Brush $17 - This brush is made from soft natural bristles. It's similar to the Coastal Scents brush in terms of application; however, the head of the Japonesque brush is a little longer, more rounded & a little denser.

Ulta Tapered Crease Eyeshadow Brush $14 - This brush is made with a blend of soft squirrel and pony hair. It has a tapered point and is dense & firm. It's similar to the Studio Gear brush in terms of density; however, the head of the Ulta brush is more pointed and is a little shorter. In comparison to the other 3 brushes, the Ulta brush is wider, denser and firmer. 

Studio Gear Blending Crease Brush $30 - This brush is made from squirrel hair and is super soft. The bristles are dense and firm. It has the largest head compared to the other 4 brushes. The Studio Gear brush is similar to the Ulta brush in terms of density; however, the head of the Studio Gear brush is more rounded and is a little longer. 

From Top to Bottom: Coastal Scents C138 Sable Contour brush, NARS #14 Eye Contour brush, Japonesque Professional Eye Shadow Crease brush, Ulta Pro Tapered Crease Eyeshadow brush, Studio Gear #35 Blending Crease Contour brush

*Application*

Coastal Scents Sable Contour Brush $1.79 - This brush is great for crease work, defining the outer v, blending product on the lower lash line, and adding color to the outer corner of the eye & a highlight color to the inner tear duct. However, it's not my favorite brush to use for adding eyeshadow onto the lower lash line because I find it to be a little too wide, thick and flimsy for that purpose.

NARS Eye Contour Brush $28 - This brush is ideal for adding eyeshadow on the lower lash line and defining the outer v. It gives better precision than the Coastal Scents brush because the NARS brush is pointier and thinner at the tip. The only gripe I have is that it feels a bit prickly during application.

Japonesque Professional Crease Brush $17 - This brush is great for crease work, defining the outer v, blending product on the lower lash line, and adding color to the outer corner of the eye & a highlight color to the inner tear duct. However, I find it to be a little too wide & thick to use for adding eyeshadow onto the lower lash line. I only use it for that purpose when my Royal & Langnickel BC410 Silk Eye Shader SM brush (mini review)Mac 239 Eye Shader brush (full review) are dirty.

Ulta Tapered Crease Eyeshadow Brush $14 -  This brush is great for crease work, blending product on the lower lash line, and adding color to the outer corner of the eye & a highlight color to the inner tear duct. It's similar to the Studio Gear brush in terms of application, but I prefer the Ulta brush more because the tip is slightly pointed and fits in my crease better. However, I find it to be a little too wide & thick to use for adding color onto the lower lash line. 

Studio Gear Blending Crease Brush $30 - This brush is great for crease work, blending product on the lower lash line, and adding color to the outer corner of the eye & a highlight color to the inner tear duct. However, I find it to be a little too wide & thick to use for adding color onto the lower lash line. 

From Left to Right: Coastal Scents C138 Sable Contour brush, NARS #14 Eye Contour brush, Japonesque Professional Eye Shadow Crease brush, Ulta Pro Tapered Crease Eyeshadow brush, Studio Gear #35 Blending Crease Contour brush
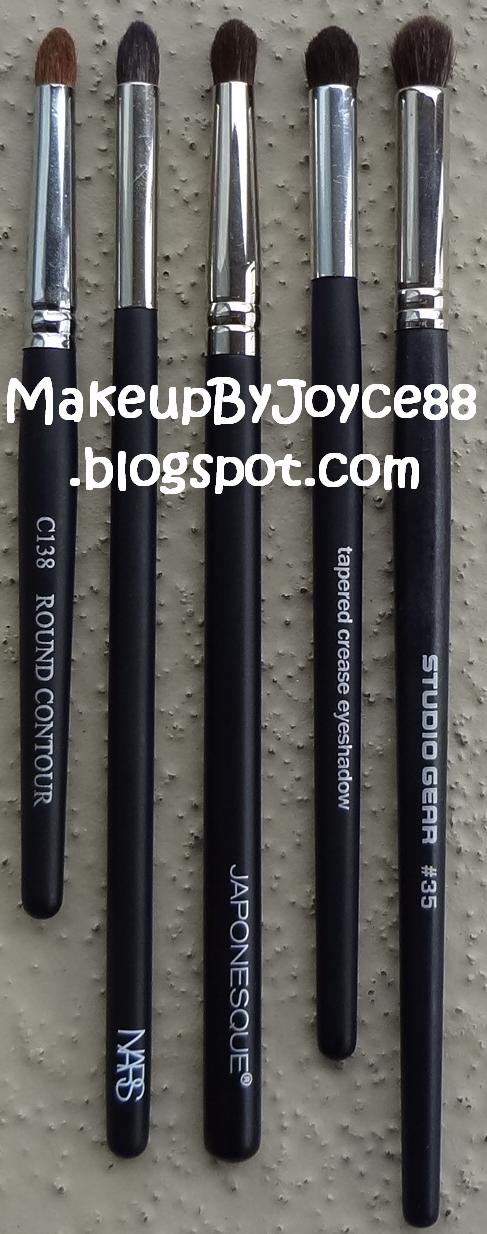
Bottom Line: I recommend getting the Coastal Scents brush if you're on a budget and the Japonesque brush if you have a little more money to spend because the bristles are slightly fuller & offers better control for crease work. However, i would skip the NARS brush because it feels a bit prickly during application and I would also skip the Studio Gear brush because the Ulta brush works the same, if not better, and is cheaper. Also, it is important to note that I have not experienced any shedding, dye bleeding or funky smell with any of these brushes.

From Left to Right: Coastal Scents C138 Sable Contour brush, NARS #14 Eye Contour brush, Japonesque Professional Eye Shadow Crease brush, Ulta Pro Tapered Crease Eyeshadow brush, Studio Gear #35 Blending Crease Contour brush

Note: The Coastal Scents Sable Contour brush measures 5.5 inches and is available for purchase on Coastal Scents' website. The NARS Eye Contour brush measures 7 inches and is available on Nordstrom. The Japonesque Professional Crease brush measures 7 inches, while the Ulta Tapered Crease Eyeshadow brush measures 6.25 inches. They are both available at Ulta. The Studio Gear Blending Crease brush measures 7.5 inches and is available at Studio Gear's online store.

Have you tried any of the brushes that I have mentioned above?
What brush do you use for defining and crease work?

*This post contains affiliate links. None of the products mentioned are sponsored.

Thursday, November 10, 2011

Review + Comparison - Mac 214 Brush vs Coastal Scents Chisel Shader vs Nars Smudge Brush

Left to Right: NARS Smudge brush, MAC 214 brush, Coastal Scents Chisel Shader brush

A few weeks ago, I bought the NARS Smudge brush with a 20% off coupon, the MAC 214 Short Shader brush with a gift card & the Coastal Scents Chisel Shader brush with a 30% off coupon. I'm too cheap to pay retail, so I always wait for a sale before I make a purchase. Plus, I use gift cards and Ebates to get cash back, whenever I can. =)

NARS #15 Smudge Brush - bristles are denser, firmer, thicker & shorter than the MAC & Coastal Scents version

MAC 214 Short Shader Brush - bristles are less denser, less firmer, less thicker & longer than the NARS version, but denser, firmer, thicker & has a flatter tip than the Coastal Scents version

Coastal Scents Chisel Shader Brush - bristles are less denser, less firmer, less thicker & has a more rounded tip than the NARS & MAC version 

Left to Right: NARS Smudge brush, MAC 214 brush, Coastal Scents Chisel Shader brush

I usually use a pencil or contour brush, such as the Coastal Scents Sable Contour brush, to add eyeshadow on my lower lash line. Pencil/contour brushes don't irritate my eye area, however, I find that they give me poor control since these types of brushes are thicker and wider. So I decided to try the NARS Smudge brush, MAC 214 brush and Coastal Scents Chisel Shader brush. These short shader/smudge brushes work better than the pencil/contour brushes because they give me better control and precision. All 3 of these brushes are firm, dense and thin. They are great for detail work, especially for adding eyeshadow on the lower lash line. However, they all scratch my skin when I use them on my lower lash line. I'm assuming that I just have a sensitive eye area because when I rub my fingers through the bristles, they feel soft and not scratchy at all. However, I'm still going to return the NARS and MAC brush because I can't bear the scratchiness when I use them on my lower lash line. As for the Coastal Scents brush, I can't return it, so I'll just use it when my pencil/contour brushes are dirty.

Bottom Line: Even though these 3 brushes have minor differences amongst them, they all essentially work the same. They give great precision and I highly recommend the Coastal Scents version (since it's the cheapest and there is always a sale), if you can bear the scratchiness, but please keep in mind that it only felt scratchy when I used it on my lower lash line. It did not feel scratchy when I used it on the rest of my eye area or when I rubbed my fingers through the bristles. Also, I didn't experience any shedding, funky smell or dye bleeding with any of the brushes.

Note: The NARS #15 Smudge brush measures 7 inches and retails for $26. The MAC 214 Short Shader brush measures 6 inches and retails for $24.50. The Coastal Scents 253 Chisel Shader brush measures 6.25 inches and retails for $3.95.

Have you tried the NARS, MAC or Coastal Scents version?
What brush do you use to add eyeshadow on your lower lash line?


*This post contains affiliate links. None of the products mentioned are sponsored.

Friday, November 4, 2011

Review: EcoTools Bamboo Finishing Kabuki Brush


It seems like every makeup company has their own version of the stippling/skunk brush; however, none of the ones that I have encountered are as dense and firm as the Mac 187 (full review) or the Sephora #44 brush (full review), which is the densest and firmest duo fiber brush that I have tried. As expected, the EcoTools Bamboo Finishing Kabuki brush is not a "dupe" for either the Mac 187 or Sephora #44 brush.

(There is a crack in the middle of the handle because my butter fingers dropped it.)

First off, the handle of the EcoTools brush is made from bamboo, while the bristles are made from synthetic material, specifically, taklon; therefore, this brush is environmentally friendly and animal cruelty-free. The hairs are so soft and does not shed at all; however, I find it a little too big for blush application and too flimsy for buffing or stippling liquid foundation. It's difficult to get into the small crevices of the face because the brush is too big and not firm enough. I still prefer to use my Mac 187 and Sephora #44 brush to apply liquid foundation because they are both firmer and denser. Plus, they give better coverage and better control. The only use that I find for the EcoTools brush is for applying a light dusting of setting powder.


Pros:
  • feels soft
  • no shedding
  • no dye bleeding
  • no funky smell
  • easy to wash, no staining
  • great for applying setting powder
  • not expensive
  • base is flat, handle can stand upright

Cons:
  • head is too big for applying foundation in the small crevices of the face
  • bristles are too flimsy for foundation application
  • too big for the cheek area, not ideal for applying blush


Because I already have my favorite brush (full review) for applying setting powder, I decided to wrap a hair tie around the bristles to make it firmer and densely packed in order to make foundation application easier. I don't recommend my readers to do this because it will damage the bristles and cause them to break in the long-run. I do this because I don't have any other use for this brush. If I don't do this, the brush is just going to be sitting on my vanity collecting dust. However, I must admit, it looks so unattractive with the hair tie choking the bristles, but I only do this when my other foundation brushes are dirty and when I need it for "emergencies."


Bottom Line:  It's not multi-functional in its original state (not counting when it has a hair tie wrapped around the bristles). It's only best suited for applying setting powder because it gives a light application. However, the quality of the brush is great because it doesn't shed and it's soft. I just find it too big and too flimsy for applying foundation. 

Note: The EcoTools Bamboo Finishing Kabuki brush measures 4 inches and you can purchase this at Ulta, Target, and drugstore.com for around $7.

Do you like using the EcoTools Bamboo 
Finishing Kabuki Brush for foundation application?

*This post contains affiliate links. None of the products mentioned are sponsored.

Wednesday, November 2, 2011

Swatches, Comparisons + Review: Milani 05 Luminoso Baked Powder Blush


If you've entered my current giveaway, 
then you know that the Milani Luminoso blush (brand new & sealed) is one of the prizes. 
The one that I'm reviewing is from my personal collection and I will not be giving it away. 
Don't worry! =)


Pros:
  • regular pigmentation (not sheer or too pigmented)
  • blends easily
  • applies smoothly
  • lasts 14+ hours (when worn over foundation + setting powder)

Cons:
  • compact is thick and bulky (because there is a compartment below the pan that contains a mirror and brush)
  • brush applies blotchy and uneven
Indoors with Natural Lighting

I've been wearing Luminoso for the past 3 weeks and absolutely love it. It translates into a beautiful peachy pink shade on my cheeks. For reference, I'm a Mac NC30/35, L'oreal True Match W4, MUFE HD 127, and Dior Forever 021 mixed with 031.

I was afraid that it was going to be too shimmery, but it's actually safe to wear during the day. Under artificial lighting and indoors, the blush has a semi-matte finish. It only looks slightly shimmery under direct sunlight. 

It applies smoothly and evenly when I use my Mac 168 angled brush (full review), Japonesque Professional blush brush (mini review), and Studio Gear #13 brush (mini review). I'm not a fan of the brush that comes with the compact because it applies blotchy and uneven. It's also not as soft as my full size brushes. 

Outdoors under Direct Sunlight

I have a heavy hand, so it's a good thing that Luminoso is not too pigmented. Even if I do over apply it, it's very easy to buff out and blend. It also lasts more than 14 hours on my cheeks when I apply it over foundation & setting powder. 

The blush contains 3.5g of product, which is the standard size for most baked blushes in the market. Mac's Mineralize blushes also contain 3.5g, but non-baked powder blushes contain 6g-10g. So, it would be a major plus if Milani was able to offer more product at the same price point. Wouldn't that be awesome?

Outdoors Natural Lighting

Luminoso is definitely not a dupe for Mac's Marine Life (swatches + review) or Burberry's Blossom blush (swatches + review). Luminoso is more peachy compared to the other two blushes.

Bottom Line: I highly recommend checking out Luminoso, if you don't mind the amount of product it contains because the quality of the blush is great. It applies evenly and compliments my medium warm complexion very well. Plus, I don't have to touch up throughout the day because it lasts for more than 14 hours on my cheeks. However, the color may not show up on darker beauties and don't expect much from the mini brush. Also, I wish the compact was matte black and not a tacky looking gold case, but this is just my personal preference.

Outdoors Natural Lighting

Note: The Milani Baked Powder Blush in 05 Luminoso contains 3.5g and you can purchase this at Milani's online store, Target and drugstore.com for around $8.

Have you tried Luminoso? 
What do you think about the product size?

*This post contains affiliate links. None of the products mentioned are sponsored.

Tuesday, November 1, 2011

Swatches & Comparisons: Prestige Cosmetics Single Eyeshadows

Top Row: Golden Retriever, Royale, Perfection
Bottom Row: Flushed 1st Version, Flushed 2nd Version, Love

Pros:
  • not expensive compared to other eyeshadows, such as Mac or Urban Decay
  • doesn't crease when used with a primer
  • blends easily
  • no fallouts during application (except C-202 Flushed)
  • C-179 Golden Retriever has great color payoff when used with a primer
  • C-179 Golden Retriever has a buttery texture
  • C-163 Love and C-179 Golden Retriever applies smoothly
  • C-179 Golden Retriever doesn't get dusty in the pan

Cons:
  • fades a bit after 8 hours, even with a primer (except C-231 Royale)
  • C-231 Royale fades a bit within 30 minutes of application
  • gets dusty in the pan (except C-179 Golden Retriever)
  • C-202 Flushed has fallouts during application
  • C-202 Flushed has a gritty texture

From Left: Golden Retriever, Royale, Perfection


Urban Decay Half Baked - It's a true gold that doesn't look too yellow or orange & has a metallic frost finish. This is not a dupe for C-179 Golden Retriever because Golden Retriever is warmer and has an orange tint.

C-179 Golden Retriever - It's a warm bronzey gold with an orange tint & shimmery finish. It has great pigmentation when used with a primer, no fallouts during application, doesn't get dusty in the pan, doesn't crease, has a buttery texture, blends easily & applies smoothly. I personally don't like the color because it's a little too orange; however, I still recommend this shade (if you like the color) because the quality is great.

Mac Woodwinked - It's a warm antiqued gold with a copper brown undertone & a shimmery finish with a metallic shine. This is not a dupe for C-179 Golden Retriever because Woodwinked has a cool gold sheen to it.

C-231 Royale - It's a blue based violet with a soft shimmery finish that's not too frosty. It has decent color payoff when layered & used with a primer, no fallouts during application, doesn't crease & blends easily, but it fades a bit within 30 minutes of application & gets dusty in the pan.

Mac Haux - It's a mauvey rosy brown with a satin finish. This is not a dupe for C-238 Perfection because Haux is more rosy.

C-238 Prestige Perfection - It's a mauvey brown with a matte finish. It has good color payoff when layered & used with a primer, no fallouts during application, doesn't crease, blends easily, & doesn't look chalky, but it gets dusty in the pan. Overall, I like this shade and it's a great color for the crease.

    From Left: Flushed 1st Version, Flushed 2nd Version, Love


    C-202 Flushed 2nd Version + 1st Version - It's a light champagne with a baby pink iridescence & has a shimmery finish with gold glitters. I have 2 Prestige eyeshadows in the same color and they look different in the pan and when swatched on my arm. The 2nd version looks a little more pink than the 1st version. However, when worn on my eyes, both versions look the same. They both have good color payoff when layered and used with a primer. They also blend easily and don't crease, but they have a gritty texture and they get dusty in the pan. The major issue with this shade is that there are alot of fallouts during application.

    C-163 Love - It's a bright hot pink with a shimmery finish. It has good color payoff when used with a primer, no fallouts during application, doesn't crease, blends easily & applies smoothly, but it gets dusty in the pan.

    Top Row: Golden Retriever, Royale, Perfection
    Bottom Row: Flushed 1st Version, Flushed 2nd Version, Love

    Bottom Line: Although they're not as pigmented as Mac or Urban Decay eyeshadows, I still recommend getting Golden Retriever, Perfection and Love if you are on a budget and like those shades because the pigmentation is good enough for a drugstore brand, but I would stay away from Royale and Flushed. The pigmentation of Royale is not terrible, but you can find better pigmentation elsewhere at a comparable price too. Also, Flushed has major fallouts during application and will leave your under eye area filled with glitter. If you still insist on getting Flushed, then I recommend doing your eye makeup before applying your foundation so that you can wipe off the glittery mess without ruining your foundation.

    Note: The Prestige eyeshadows contain 2.2g each and you can purchase this at Prestige's online storeUlta and drugstore.com for around $3.95. As with any drugstore product, I would definitely wait for a sale because there is always a "buy one, get one half off" or even a "buy one, get one for free" sale.

    Have you tried any of Prestige's single eyeshadows?

    *This post contains affiliate links. None of the products mentioned are sponsored.
     
    Related Posts Plugin for WordPress, Blogger...